参考文档:https://ansible-tran.readthedocs.io/en/latest/docs/playbooks.html
Ansible 的战操作基础介绍和环境部署可以参考我这篇文章:Ansible 介绍与实战操作演示
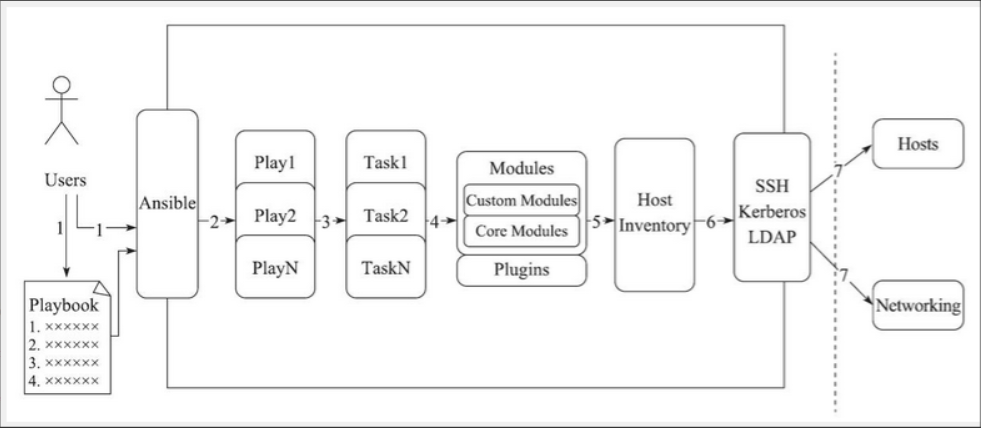
Hosts:运行指定任务的目标主机
remoute_user:在远程主机上执行任务的用户;
sudo_user:
tasks:任务列表

tasks的具体格式:

tasks:
- name: TASK_NAME
module: arguments
notify: HANDLER_NAME
handlers:
- name: HANDLER_NAME
module: arguments

##模块,模块参数:
格式如下:
(1)action: module arguments
(2) module: arguments
注意:shell和command模块后直接加命令,而不是key=value类的参数列表


handlers:任务,在特定条件下触发;接受到其他任务的通知时被触发;
---
- hosts: web
remote_user: root
tasks:
- name: install nginx        ##安装模块,需要在被控主机里加上nginx的源
yum: name=nginx state=present
- name: copy nginx.conf    ##复制nginx的配置文件过去,需要在本机的/tmp目录下编辑nginx.conf
copy: src=/tmp/nginx.conf dest=/etc/nginx/nginx.conf backup=yes
notify: reload    #当nginx.conf发生改变时,通知给相应的handlers
tags: reloadnginx    #打标签
- name: start nginx service    #服务启动模块
service: name=nginx state=started
tags: startnginx    #打标签

handlers:
- name: reload
service: name=nginx state=restarted
variables变量有四种定义方法。如下:
ansible中有setup模块,这个模块就是通过facts组件来实现的,主要是节点本身的一个系统信息,bios信息,网络,硬盘等等信息。这里的variables也可以直接调用facts组件的facters我们可以使用setup模块来获取,然后直接放入我们的剧本之中调用即可。
ansible web -m setup
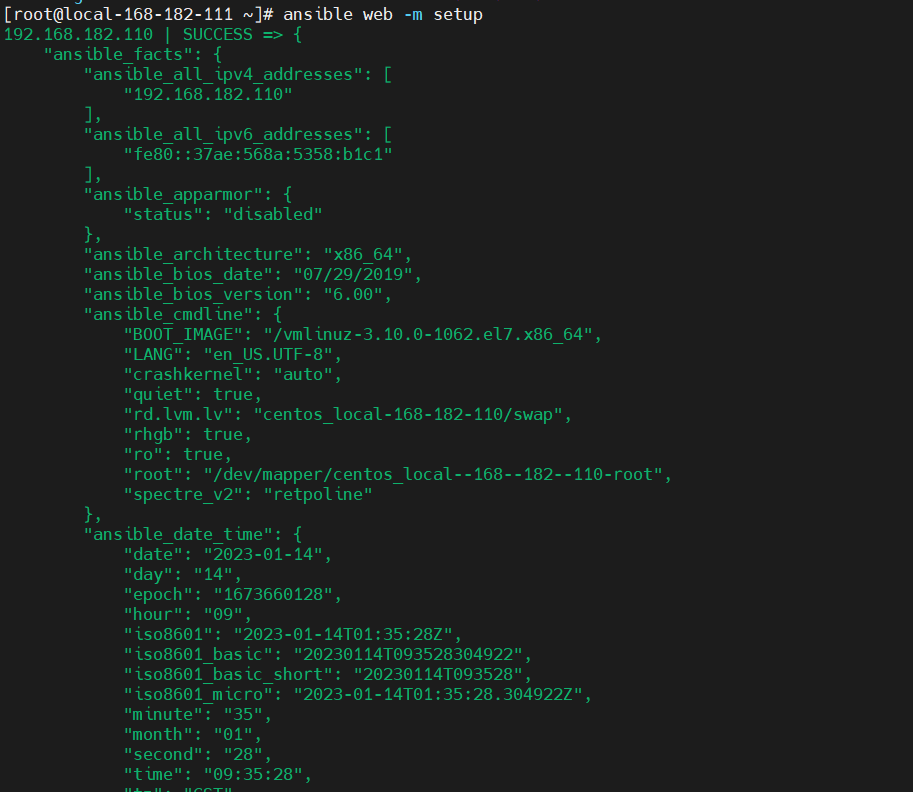
常用的几个参数:
ansible_all_ipv4_addresses # ipv4的所有地址
ansible_all_ipv6_addresses # ipv6的所有地址
ansible_date_time # 获取到控制节点时间
ansible_default_ipv4 # 默认的ipv4地址
ansible_distribution # 系统
ansible_distribution_major_version # 系统的大版本
ansible_distribution_version # 系统的版本号
ansible_domain #系统所在的域
ansible_env #系统的环境变量
ansible_hostname #系统的主机名
ansible_fqdn #系统的全名
ansible_machine #系统的架构
ansible_memory_mb #系统的内存信息
ansible_os_family # 系统的家族
ansible_pkg_mgr # 系统的包管理工具
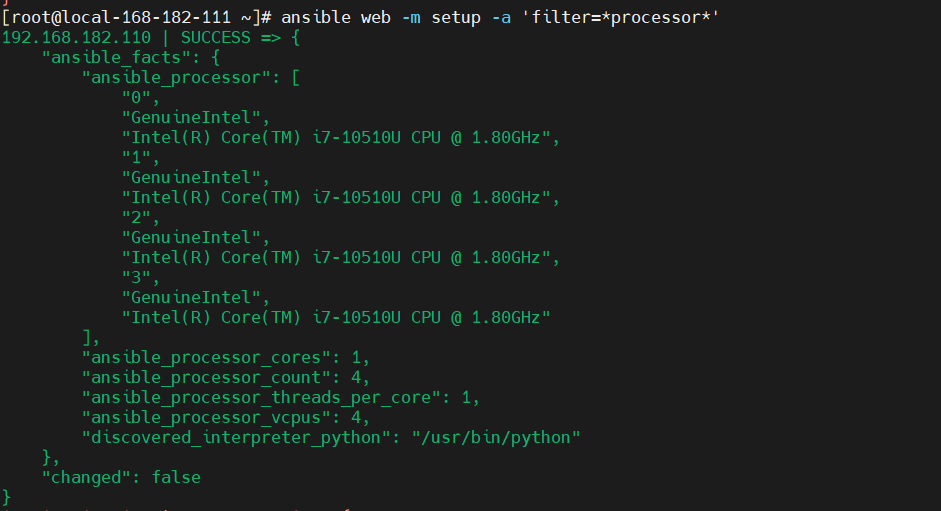
ansible_processor_cores #系统的cpu的核数(每颗)
ansible_processor_count #系统cpu的颗数
ansible_processor_vcpus #系统cpu的总个数=cpu的颗数*CPU的核数
ansible_python # 系统上的python
搜索
ansible web -m setup -a 'filter=*processor*'
自定义变量有两种方式
ansible-playbook命令行中的 -e VARS,--extra-vars VARS,这样就可以直接把自定义的变量传入
使用playbook定义变量,实例如下:
---
- hosts: web
remote_user: root
tasks:

- name: install { {  rpmname }}
yum: name={ {  rpmname }} state=present
- name: copy { {  rpmname }}.conf
copy: src=/tmp/{ {  rpmname }}.conf dest=/etc/{ {  rpmname }}/{ {  rpmname }}.conf backup=yes
notify: reload
tags: reload{ {  rpmname }}
- name: start { {  rpmname }} service
service: name={ {  rpmname }} state=started
tags: start{ {  rpmname }}

handlers:
- name: reload
service: name={ {  rpmname }} state=restarted
使用:
ansible-playbook nginx.yml -e rpmname=keepalived
ansible-playbook nginx.yml --extra-vars rpmname=keepalived
##在playbook中定义变量如下:
vars:
- var1: value1
- var2: value2
使用:
---
- hosts: web
remote_user: root
vars:
- rpmname: keepalived
tasks:
- name: install { {  rpmname }}
yum: name={ {  rpmname }} state=present
- name: copy { {  rpmname }}.conf
copy: src=/tmp/{ {  rpmname }}.conf dest=/etc/{ {  rpmname }}/{ {  rpmname }}.conf backup=yes
notify: reload
tags: reload{ {  rpmname }}
- name: start { {  rpmname }} service
service: name={ {  rpmname }} state=started
tags: start{ {  rpmname }}

handlers:
- name: reload
service: name={ {  rpmname }} state=restarted
下面介绍roles会使用roles传递变量,小伙伴可以翻到下面看详解讲解。
可以在主机清单中定义,方法如下:
#向不同的主机传递不同的变量
IP/HOSTNAME varaiable=value var2=value2

#向组中的主机传递相同的变量
[groupname:vars]
variable=value
- hosts: web
remote_user: root#代表用root用户执行,默认是root,可以省略
tasks:
- name: createfile
copy: content="test3" dest=/opt/p1.yml
when: a=='3'
- name: createfile
copy: content="test4" dest=/opt/p1.yml
when: a=='4'
如果a"3",就将“test3”,写入到web组下被管控机的/opt/p1.yml中,
如果a"4",就将“test4”,写入到web组下被管控机的/opt/p1.yml中。
执行
# 语法校验
ansible-playbook  --syntax-check p1.yml

#执行
ansible-playbook -e 'a="3"' p1.yml
- hosts: web
tasks:
- name: installnginx
yum: name=nginx
- name: copyfile
copy: src=/etc/nginx/nginx.conf dest=/etc/nginx/nginx.conf
tags: copyfile
- name: start
service: name=nginx static=restarted
执行
# 语法校验
ansible-playbook  --syntax-check p2.yml

#执行
ansible-playbook -t copyfile p2.yml
创建三个用户
- hosts: web
tasks:
- name: createruser
user: name={ {  item }}
with_items:
- shy1
- shy2
- shy3
- name: creategroup
group: name={ {  item }}
with_items:
- group1
- group2
- group3
执行
#语法校验
ansible-playbook  --syntax-check p3.yml

#执行
ansible-playbook p3.yml 用户shy1的属组是group1,用户shy2的属组是group2,用户shy3的属组是group3
- hosts: web
tasks:
- name: creategroup
group: name={ { item}}
with_items:
- group3
- group4
- group5
- name: createuser
user: name={ { item.user}} group={ { item.group}}
with_items:
- { 'user': shy3,'group': group3}
- { 'user': shy4,'group': group4}
- { 'user': shy5,'group': group5}
执行
#语法校验
ansible-playbook  --syntax-check p4.yml

#执行
ansible-playbook p4.yml
该模板支持:
字符串:使用单引号或双引号;
  数字:整数,浮点数;
  列表:[item1, item2, ...]
  元组:(item1, item2, ...)
  字典:{ key1:value1, key2:value2, ...}
  布尔型:true/false
  算术运算:
    +, -, *, /, //, %, **
  比较操作:
    ==, !=, >, >=, <, <=
  逻辑运算:
    and, or, not
【示例】
user  nginx; #设置nginx服务的系统使用用户
worker_processes  { {  ansible_processor_vcpus }}; #工作进程数

error_log  /var/log/nginx/error.log warn; #nginx的错误日志
pid        /var/run/nginx.pid; #nginx启动时候的pid

events {
worker_connections  1024; #每个进程允许的最大连接数
}

http {  #http请求配置,一个http可以包含多个server

#定义 Content-Type
include       /etc/nginx/mime.types;
default_type  application/octet-stream;

#日志格式 此处main与access_log中的main对应
#$remote_addr:客户端地址
#$remote_user:http客户端请求nginx认证的用户名,默认不开启认证模块,不会记录
#$timelocal:nginx的时间
#$request:请求method + 路由 + http协议版本
#status:http reponse 状态码
#body_bytes_sent:response body的大小
#$http_referer:referer头信息参数,表示上级页面
#$http_user_agent:user-agent头信息参数,客户端信息
#$http_x_forwarded_for:x-forwarded-for头信息参数
log_format  main  '$http_user_agent' '$remote_addr - $remote_user [$time_local] "$request" '
'$status $body_bytes_sent "$http_referer" '
'"$http_user_agent" "$http_x_forwarded_for"';

#访问日志,后面的main表示使用log_format中的main格式记录到access.log中
access_log  /var/log/nginx/access.log  main;

#nginx的一大优势,高效率文件传输
sendfile        on;
#tcp_nopush     on;

#客户端与服务端的超时时间,单位秒
keepalive_timeout  65;

#gzip  on;
server {  #http服务,一个server可以配置多个location
listen       { {  nginxport }}; #服务监听端口
server_name  localhost; #主机名、域名

#charset koi8-r;
#access_log  /var/log/nginx/host.access.log  main;

location / {
root   /usr/share/nginx/html; #页面存放目录
index  index.html index.htm; #默认页面
}

#error_page  404              /404.html;

# 将500 502 503 504的错误页面重定向到 /50x.html
error_page   500 502 503 504  /50x.html;
location = /50x.html {  #匹配error_page指定的页面路径
root   /usr/share/nginx/html; #页面存放的目录
}

# proxy the PHP scripts to Apache listening on 127.0.0.1:80
#
#location ~ \.php$ {
#    proxy_pass   http://127.0.0.1;
#}

# pass the PHP scripts to FastCGI server listening on 127.0.0.1:9000
#
#location ~ \.php$ {
#    root           html;
#    fastcgi_pass   127.0.0.1:9000;
#    fastcgi_index  index.php;
#    fastcgi_param  SCRIPT_FILENAME  /scripts$fastcgi_script_name;
#    include        fastcgi_params;
#}

# deny access to .htaccess files, if Apache's document root
# concurs with nginx's one
#
#location ~ /\.ht {
#    deny  all;
#}
}
include /etc/nginx/conf.d/*.conf;
}
---
- hosts: web
remote_user: root
vars:
- rpmname: nginx
- nginxport: 8088
tasks:
- name: install { {  rpmname }}
yum: name={ {  rpmname }} state=present
- name: copy { {  rpmname }}.conf
copy: src=/tmp/{ {  rpmname }}.conf dest=/etc/{ {  rpmname }}/{ {  rpmname }}.conf backup=yes
notify: reload
tags: reload{ {  rpmname }}
- name: start { {  rpmname }} service
service: name={ {  rpmname }} state=started
tags: start{ {  rpmname }}

handlers:
- name: reload
service: name={ {  rpmname }} state=restarted
使用
##使用reloadnginx标签,重新加载剧本
copy与template的区别
notify:触发
handlers:触发的动作
使用上场景:修改配置文件时
【示例】 正常情况时handlers是不会执行的
- hosts: web
tasks:
- name: installredis
yum: name=redis
- name: copyfile
template: src=redis.conf dest=/etc/redis.conf
tags: copyfile
notify: restart
- name: start
service: name=redis state=started
handlers:
- name: restart
service: name=redis
执行
ansible-playbook -t copyfile p6.yml
一般情况下将roles写在/etc/ansible/roles中,也可以写在其他任意位置(写在其他位置要自己手动建立一个roles文件夹)
创建目录
mkdir -pv ./{ nginx,mysql,httpd}/{ files,templates,vars,tasks,handlers,meta,default}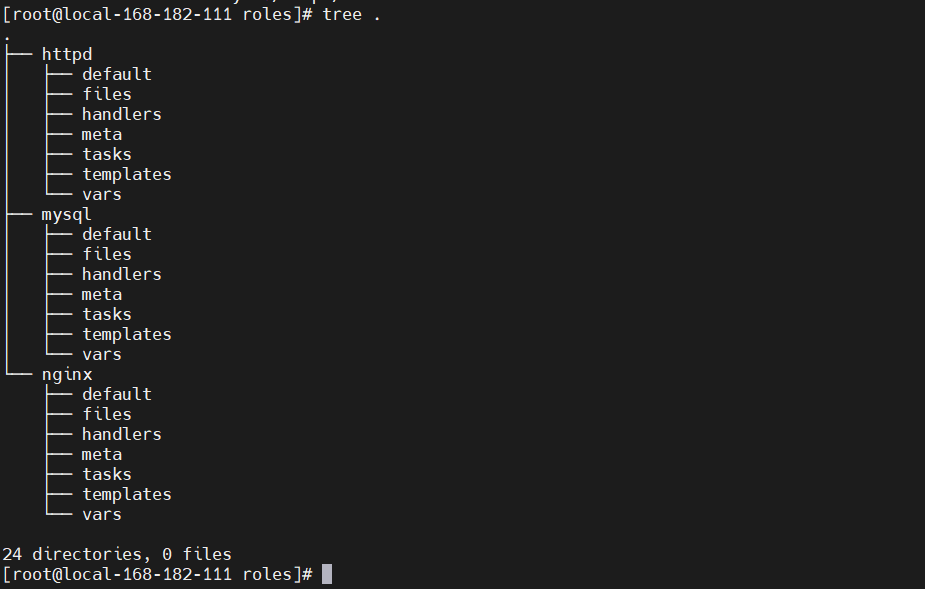
【1】创建目录
mkdir -pv ./{ nginx,mysql,httpd}/{ files,templates,vars,tasks,handlers,meta,default}【2】定义配置文件
先下载nginx rpm部署包
# 下载地址:http://nginx.org/packages/centos/7/x86_64/RPMS/
wget http://nginx.org/packages/centos/7/x86_64/RPMS/nginx-1.18.0-1.el7.ngx.x86_64.rpm -O nginx/files/nginx-1.18.0-1.el7.ngx.x86_64.rpm
- name: cp
copy: src=nginx-1.18.0-1.el7.ngx.x86_64.rpm dest=/tmp/nginx-1.18.0-1.el7.ngx.x86_64.rpm
- name: install
yum: name=/tmp/nginx-1.18.0-1.el7.ngx.x86_64.rpm state=latest
- name: conf
template: src=nginx.conf.j2 dest=/etc/nginx/nginx.conf
tags: nginxconf
notify: new conf to reload
- name: start service
service: name=nginx state=started enabled=true
user  nginx; #设置nginx服务的系统使用用户
worker_processes  { {  ansible_processor_vcpus }}; #工作进程数

error_log  /var/log/nginx/error.log warn; #nginx的错误日志
pid        /var/run/nginx.pid; #nginx启动时候的pid

events {
worker_connections  1024; #每个进程允许的最大连接数
}

http {  #http请求配置,一个http可以包含多个server

#定义 Content-Type
include       /etc/nginx/mime.types;
default_type  application/octet-stream;

#日志格式 此处main与access_log中的main对应
#$remote_addr:客户端地址
#$remote_user:http客户端请求nginx认证的用户名,默认不开启认证模块,不会记录
#$timelocal:nginx的时间
#$request:请求method + 路由 + http协议版本
#status:http reponse 状态码
#body_bytes_sent:response body的大小
#$http_referer:referer头信息参数,表示上级页面
#$http_user_agent:user-agent头信息参数,客户端信息
#$http_x_forwarded_for:x-forwarded-for头信息参数
log_format  main  '$http_user_agent' '$remote_addr - $remote_user [$time_local] "$request" '
'$status $body_bytes_sent "$http_referer" '
'"$http_user_agent" "$http_x_forwarded_for"';

#访问日志,后面的main表示使用log_format中的main格式记录到access.log中
access_log  /var/log/nginx/access.log  main;

#nginx的一大优势,高效率文件传输
sendfile        on;
#tcp_nopush     on;

#客户端与服务端的超时时间,单位秒
keepalive_timeout  65;

#gzip  on;
server {  #http服务,一个server可以配置多个location
listen       { {  nginxport }}; #服务监听端口
server_name  localhost; #主机名、域名

#charset koi8-r;
#access_log  /var/log/nginx/host.access.log  main;

location / {
root   /usr/share/nginx/html; #页面存放目录
index  index.html index.htm; #默认页面
}

#error_page  404              /404.html;

# 将500 502 503 504的错误页面重定向到 /50x.html
error_page   500 502 503 504  /50x.html;
location = /50x.html {  #匹配error_page指定的页面路径
root   /usr/share/nginx/html; #页面存放的目录
}

# proxy the PHP scripts to Apache listening on 127.0.0.1:80
#
#location ~ \.php$ {
#    proxy_pass   http://127.0.0.1;
#}

# pass the PHP scripts to FastCGI server listening on 127.0.0.1:9000
#
#location ~ \.php$ {
#    root           html;
#    fastcgi_pass   127.0.0.1:9000;
#    fastcgi_index  index.php;
#    fastcgi_param  SCRIPT_FILENAME  /scripts$fastcgi_script_name;
#    include        fastcgi_params;
#}

# deny access to .htaccess files, if Apache's document root
# concurs with nginx's one
#
#location ~ /\.ht {
#    deny  all;
#}
}
include /etc/nginx/conf.d/*.conf;
}nginxport: 9999
- name: new conf to reload
service: name=nginx state=restarted
- hosts: web
remote_user: root
roles:
- nginx
最后的目录结构如下:
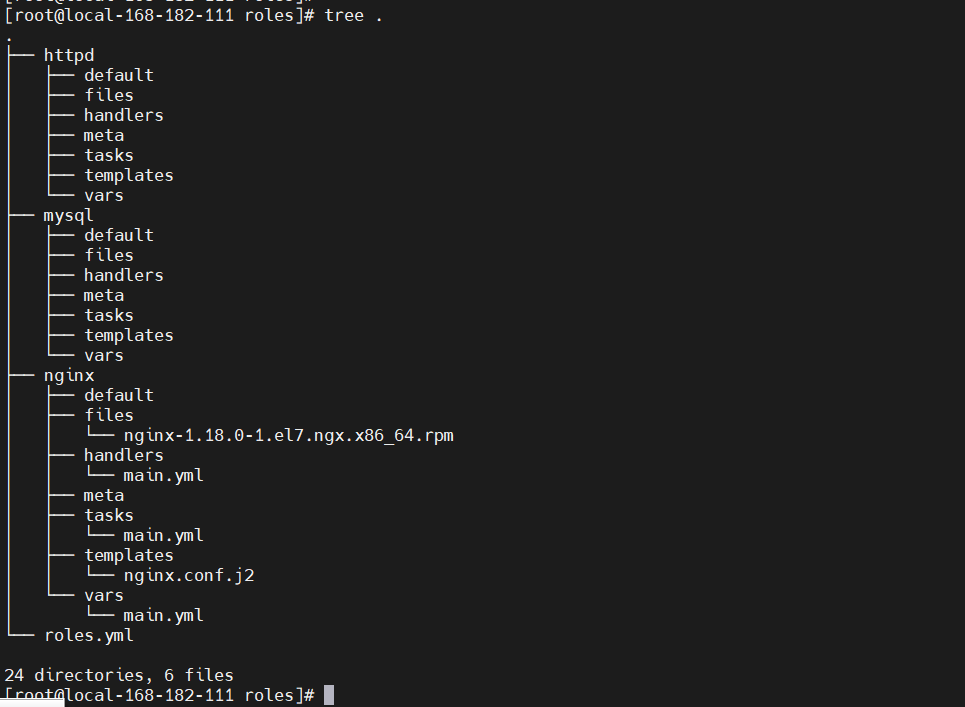
执行
ansible-playbook roles.yml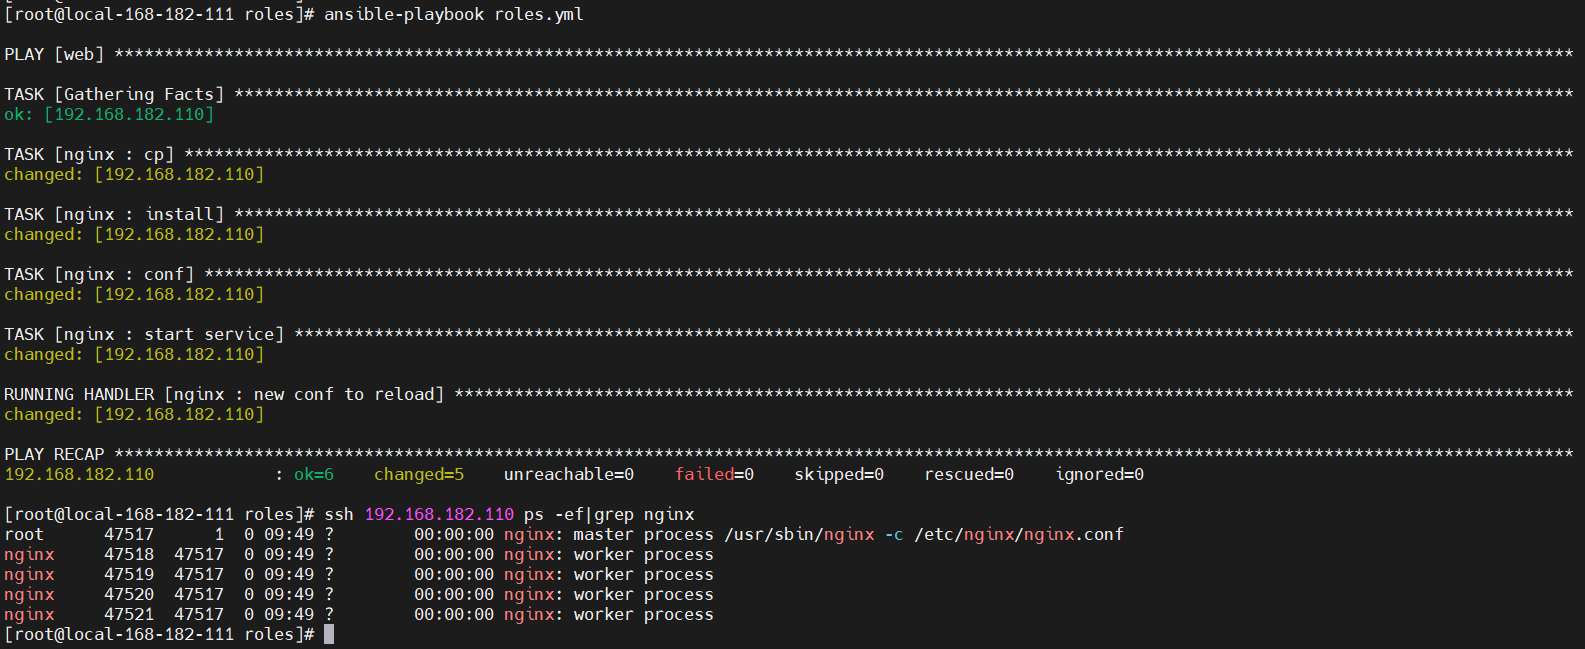
(责任编辑:时尚)
中欧班列(西安)2021年累计运输车数突破3万车 同比增长24.36%
 22日,满载着压缩机、高压隔离开关、汽车配件、自行车等50车货物的X8153次中欧班列(西安),从中国铁路西安局集团有限公司(以下简称“西安局集团公司”)新筑车站驶出,开往霍尔
...[详细]
22日,满载着压缩机、高压隔离开关、汽车配件、自行车等50车货物的X8153次中欧班列(西安),从中国铁路西安局集团有限公司(以下简称“西安局集团公司”)新筑车站驶出,开往霍尔
...[详细] 近日,有网友在社交平台透露,自己在太二酸菜鱼深圳南山宝能太古城店就餐时发现,该店可以单点单人份的酸菜鱼,价格约为68元/份。从太二点餐小程序看,其已在164元左右的老高同款2人套餐和174元的有鱼有肉
...[详细]
近日,有网友在社交平台透露,自己在太二酸菜鱼深圳南山宝能太古城店就餐时发现,该店可以单点单人份的酸菜鱼,价格约为68元/份。从太二点餐小程序看,其已在164元左右的老高同款2人套餐和174元的有鱼有肉
...[详细]可孚医疗(301087.SZ)前三季度净利润2.42亿元 同比增长44.47%
 2023年10月29日晚,可孚医疗(301087.SZ)披露2023年三季度报告,报告期前三季度营业收入为21.24亿元,同比增长13.11%;归属于上市公司股东的净利润为2.42亿元,同比增长44.
...[详细]
2023年10月29日晚,可孚医疗(301087.SZ)披露2023年三季度报告,报告期前三季度营业收入为21.24亿元,同比增长13.11%;归属于上市公司股东的净利润为2.42亿元,同比增长44.
...[详细]用于文本数据分析的 Pandas:使用 Str 访问器清理和操作文本数据
 用于文本数据分析的 Pandas:使用 Str 访问器清理和操作文本数据作者:启辰8 2023-02-08 07:44:56大数据 数据分析 Pandas 中的 str 访问器提供了许多有用的字符串操
...[详细]
用于文本数据分析的 Pandas:使用 Str 访问器清理和操作文本数据作者:启辰8 2023-02-08 07:44:56大数据 数据分析 Pandas 中的 str 访问器提供了许多有用的字符串操
...[详细] 在群雄逐鹿基金代销市场的当前,商业银行仍然是主力军。中国基金业协会近日发布的2021年三季度基金代销机构公募基金保有规模数据显示,银行在股票+混合公募基金、非货币市场公募基金保有规模中的比例仍超五成。
...[详细]
在群雄逐鹿基金代销市场的当前,商业银行仍然是主力军。中国基金业协会近日发布的2021年三季度基金代销机构公募基金保有规模数据显示,银行在股票+混合公募基金、非货币市场公募基金保有规模中的比例仍超五成。
...[详细]红魔氘锋 150W 全能充 GaN 上架:1A / 2C / 1DC,999 元
 IT之家 10 月 28 日消息,红魔氘锋 150W 全能充 GaN 现已上架,1A / 2C / 1DC 接口设计,售价 999 元,10 月 31 日开卖。IT之家整理红魔氘锋 150W 全能充
...[详细]
IT之家 10 月 28 日消息,红魔氘锋 150W 全能充 GaN 现已上架,1A / 2C / 1DC 接口设计,售价 999 元,10 月 31 日开卖。IT之家整理红魔氘锋 150W 全能充
...[详细] 用艺术的眼光探索数据之美作者:晓晓 2022-12-02 15:11:52大数据 数据分析 在深入分析的情况下,我们应该用数据图形表示技术的思想。我们经常使用bar charts, histogram
...[详细]
用艺术的眼光探索数据之美作者:晓晓 2022-12-02 15:11:52大数据 数据分析 在深入分析的情况下,我们应该用数据图形表示技术的思想。我们经常使用bar charts, histogram
...[详细] 火山引擎VeCDP: 如何0-1构建与应用标签体系作者:黄杰 2023-10-30 07:30:08大数据 数据分析 火山引擎VeCDP的标签最终服务于上层的业务场景,例如营销、分析等场景。而标签体系
...[详细]
火山引擎VeCDP: 如何0-1构建与应用标签体系作者:黄杰 2023-10-30 07:30:08大数据 数据分析 火山引擎VeCDP的标签最终服务于上层的业务场景,例如营销、分析等场景。而标签体系
...[详细] 11月29日,海口市空港航空发动机维修工程有限公司向海口海关所属海口美兰机场海关申报入区引射筒自用设备,按照“提前适用”政策享受免征税款165.32万元人民币。这是海口空港综合
...[详细]
11月29日,海口市空港航空发动机维修工程有限公司向海口海关所属海口美兰机场海关申报入区引射筒自用设备,按照“提前适用”政策享受免征税款165.32万元人民币。这是海口空港综合
...[详细] 此前小米已经宣布,小米 14系列将于10月26日晚7点正式发布,届时澎湃OS也将首次亮相,今天官方继续对新机进行预热。小米 14与小米 14 Pro两款手机,依然是一大一小的组合,官方称两款手机形态各
...[详细]
此前小米已经宣布,小米 14系列将于10月26日晚7点正式发布,届时澎湃OS也将首次亮相,今天官方继续对新机进行预热。小米 14与小米 14 Pro两款手机,依然是一大一小的组合,官方称两款手机形态各
...[详细] 清明假期酒店预订量同比增长4.5倍 哪些城市热度较高?
 世界模型和DriveGPT这类大模型到底能给自动驾驶带来什么?
 怎么关闭微信的自动扣款
 股票熔断什么意思?上证指数跌多少触发熔断?