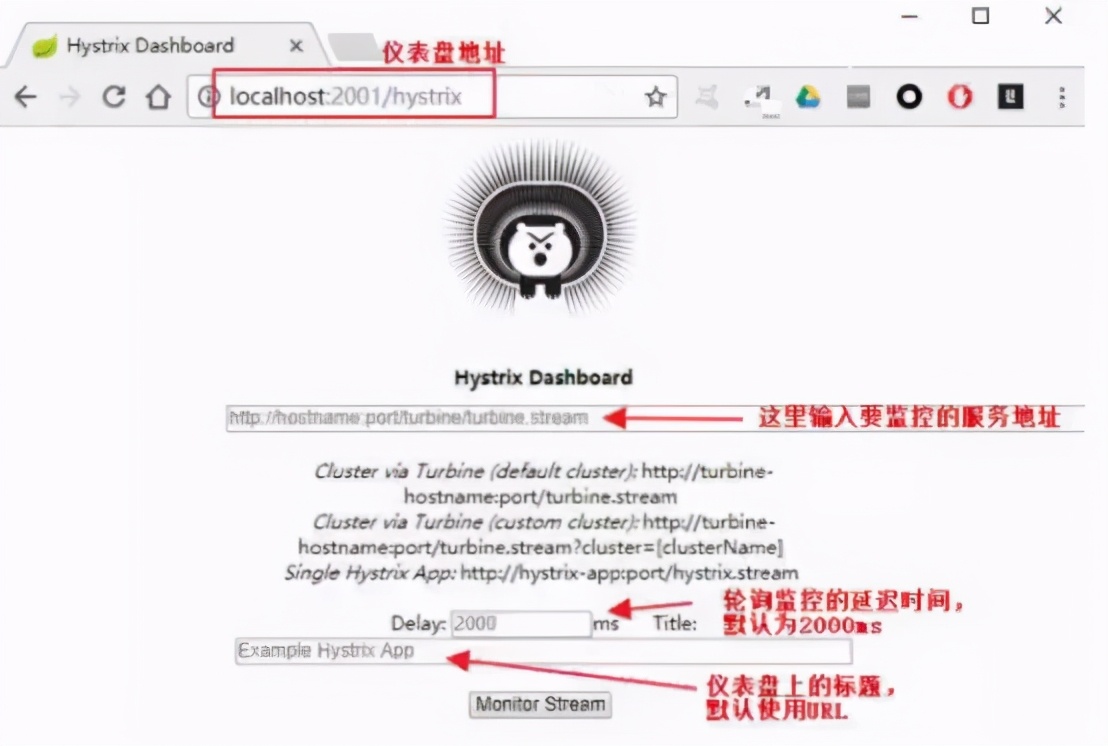
Hystrix 仪表盘(Hystrix Dashboard),监控就像汽车的搭建仪表盘实时显示汽车的各项数据一样,Hystrix 仪表盘主要用来监控 Hystrix 的配置实时运行状态,通过它我们可以看到 Hystrix 的监控各项指标信息,从而快速发现系统中存在的搭建问题进而解决它;
要使用 Hystrix 仪表盘功能,我们首先需要有一个 Hystrix Dashboard项目,配置这个功能我们可以在原来的监控消费者应用上添加,让原来的搭建消费者应用具备 Hystrix 仪表盘功能,但一般地,配置微服务架构思想是监控推崇服务的拆分,Hystrix Dashboard 也是搭建一个服务,所以通常会单独创建一个新的配置工程专门用做 Hystrix Dashboard 服务;

搭建一个 Hystrix Dashboard 服务的步骤:
比如创建一个名为

springCloud-hystrix-dashboard 的 Spring Boot 工程,建立好基本的结构和配置;
在创建好的 Spring Boot 项目的 pom.xml 文件中添加相关依赖,如下:
过时了:
- <dependency>
- <groupId>org.springframework.cloud</groupId>
- <artifactId>spring-cloud-starter-hystrix-dashboard</artifactId>
- <version>1.4.5.RELEASE</version>
- </dependency>
- <!-- spring-cloud-starter-netflix-hystrix-dashboard -->
- <dependency>
- <groupId>org.springframework.cloud</groupId>
- <artifactId>spring-cloud-starter-netflix-hystrix-dashboard</artifactId>
- </dependency>
添加好依赖之后,在入口类上添加@EnableHystrixDashboard 注解开启仪表盘功能,如下:
- @SpringBootApplication
- @EnableHystrixDashboard
- public class Application {
- public static void main(String[] args) {
- SpringApplication.run(Application.class, args);
- }
- }
最后,我们可以根据个人习惯配置一下 application.properties 文件,如下:
- server.port=3721
至此,我们的 Hystrix 监控环境就搭建好了;
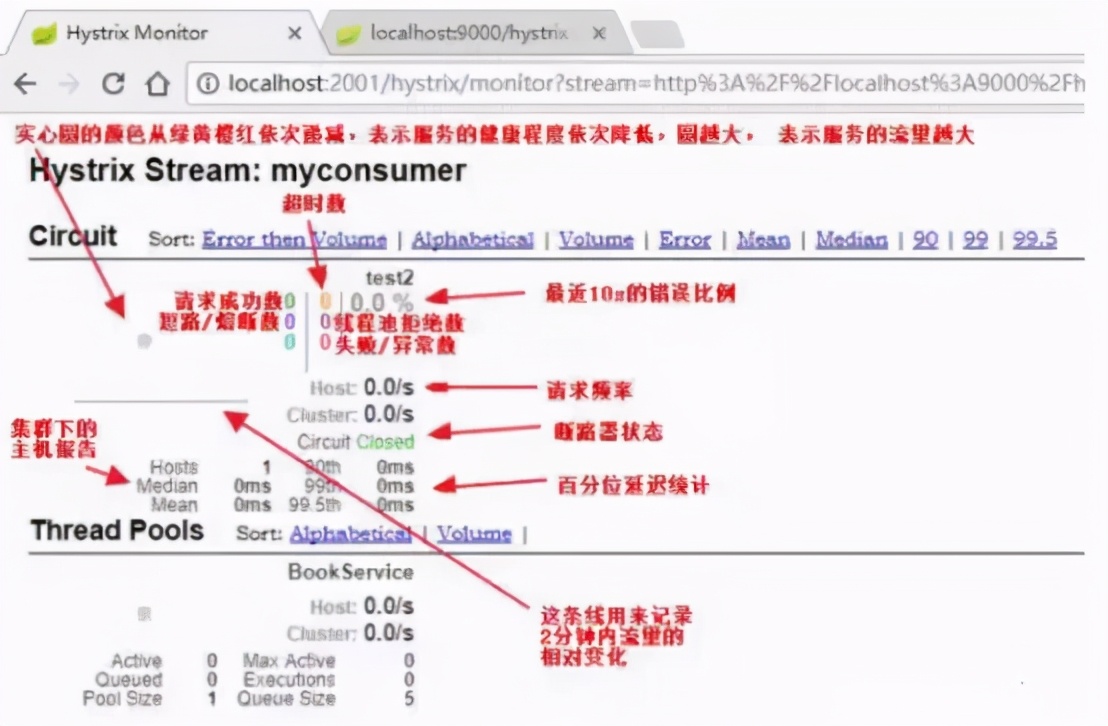
Hystrix 仪表盘工程已经创建好了,现在我们需要有一个服务,让这个服务提供一个路径为/actuator/hystrix.stream 接口,然后就可以使用 Hystrix 仪表盘来对该服务进行监控了;
我们改造消费者服务,让其能提供/actuator/hystrix.stream 接口,步骤如下:
过时的:
- <!--Spring Cloud 熔断器起步依赖-->
- <dependency>
- <groupId>org.springframework.cloud</groupId>
- <artifactId>spring-cloud-starter-hystrix</artifactId>
- <version>1.4.5.RELEASE</version>
- </dependency>
新的:
- <!-- spring-cloud-starter-netflix-hystrix -->
- <dependency>
- <groupId>org.springframework.cloud</groupId>
- <artifactId>spring-cloud-starter-netflix-hystrix</artifactId>
- </dependency>
- <dependency>
- <groupId>org.springframework.boot</groupId>
- <artifactId>spring-boot-starter-actuator</artifactId>
- </dependency>
- management.endpoints.web.exposure.include=*
这个是用来暴露 endpoints 的,由于 endpoints 中会包含很多敏感信息,除
了 health 和 info 两个支持直接访问外,其他的默认不能直接访问,所以我们
让它都能访问,或者指定:
- management.endpoints.web.exposure.include=hystrix.stream
http://localhost:8081/actuator/hystrix.stream
注意:这里有一个细节需要注意,要访问/hystrix.stream 接口,首先得访问consumer 工程中的任意一个其他接口,否则直接访问/hystrix.stream 接口时会输出出一连串的 ping: ping: …,先访问 consumer 中的任意一个其他接口,然后再访问/hystrix.stream 接口即可;
责任编辑:姜华 来源: 今日头条 SpringCloudHystrix 监控
(责任编辑:综合)
深圳三部门:持续深化融资租赁、商业保理行业清理规范 加强部门协同
 据深圳市地方金融监督管理局官网,11月5日,深圳银保监局、人民银行深圳市中心支行、深圳市地方金融监督管理局发布《关于推动金融业服务新发展格局的指导意见》,其中提到,大力整治违法违规金融活动。坚决清理和
...[详细]
据深圳市地方金融监督管理局官网,11月5日,深圳银保监局、人民银行深圳市中心支行、深圳市地方金融监督管理局发布《关于推动金融业服务新发展格局的指导意见》,其中提到,大力整治违法违规金融活动。坚决清理和
...[详细]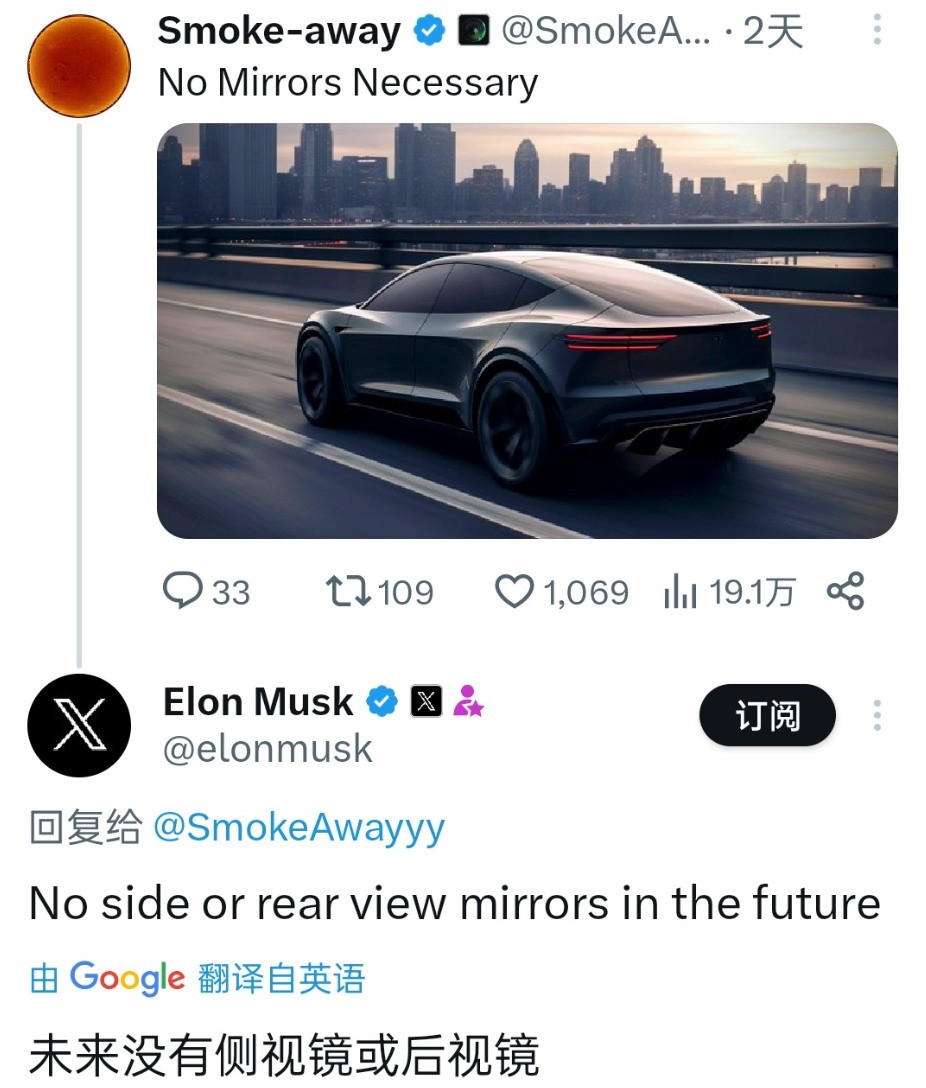 9月11日消息,对于马斯克来说,后视镜真的不应该在特斯拉上出现。近日有网友在社交媒体上发言,马斯克也是重申了自己的观点,那就是特斯拉要干掉后视镜,至于什么时候还没有说,但这是必须要做的。类似的言论,马
...[详细]
9月11日消息,对于马斯克来说,后视镜真的不应该在特斯拉上出现。近日有网友在社交媒体上发言,马斯克也是重申了自己的观点,那就是特斯拉要干掉后视镜,至于什么时候还没有说,但这是必须要做的。类似的言论,马
...[详细]三年等待,Google 终于为 Skylake 处理器带来 Linux on Chrome OS 支持
 三年等待,Google 终于为 Skylake 处理器带来 Linux on Chrome OS 支持作者:Alias_Travis 2021-07-05 12:30:17商务办公 Chrome OS
...[详细]
三年等待,Google 终于为 Skylake 处理器带来 Linux on Chrome OS 支持作者:Alias_Travis 2021-07-05 12:30:17商务办公 Chrome OS
...[详细] 需要避免的七个数据治理错误作者:John Edwards 2021-11-30 13:59:22大数据 数据分析 为了防止企业陷入可能导致其数据治理策略无效甚至危险的误区,需要注意以下七个尽力避免的数
...[详细]
需要避免的七个数据治理错误作者:John Edwards 2021-11-30 13:59:22大数据 数据分析 为了防止企业陷入可能导致其数据治理策略无效甚至危险的误区,需要注意以下七个尽力避免的数
...[详细]华电国际(600027.SH)公布消息:拟购买蒙东能源45.15%股权及福源热电36.86%股权
 华电国际(600027.SH)公布,上市公司拟向建信投资和中银投资发行普通股A股和可转换公司债券购买其分别持有的蒙东能源45.15%股权和福源热电36.86%股权,其中以发行股份、可转换公司债券支付的
...[详细]
华电国际(600027.SH)公布,上市公司拟向建信投资和中银投资发行普通股A股和可转换公司债券购买其分别持有的蒙东能源45.15%股权和福源热电36.86%股权,其中以发行股份、可转换公司债券支付的
...[详细] 【PChome影像行摄频道】如果觉得有用记得转发哦~“你知道吗?XX品牌出新相机了!”“哦~~你说那款残幅机啊?画质不好,没前途的”“你看这台机子为什么卖的比单反还贵啊?”“哇靠~这是中画幅当然要比全
...[详细]
【PChome影像行摄频道】如果觉得有用记得转发哦~“你知道吗?XX品牌出新相机了!”“哦~~你说那款残幅机啊?画质不好,没前途的”“你看这台机子为什么卖的比单反还贵啊?”“哇靠~这是中画幅当然要比全
...[详细] 壁纸神器登陆安卓!Wallpaper Engine新体验作者:我爱我家 2021-12-31 07:43:46移动开发 移动应用 作为PC动态桌面里的大神级软件Wallpaper Engine,最近将
...[详细]
壁纸神器登陆安卓!Wallpaper Engine新体验作者:我爱我家 2021-12-31 07:43:46移动开发 移动应用 作为PC动态桌面里的大神级软件Wallpaper Engine,最近将
...[详细] 绿色云计算正在推动可持续发展作者:Harris编译 2023-02-13 08:11:43云计算 绿色云计算的定义是利用技术突破来推动计算和其他IT资源的可持续性,以实现可能的环境优势。 绿色云计算
...[详细]
绿色云计算正在推动可持续发展作者:Harris编译 2023-02-13 08:11:43云计算 绿色云计算的定义是利用技术突破来推动计算和其他IT资源的可持续性,以实现可能的环境优势。 绿色云计算
...[详细] 天气转冷,北京租赁市场也正式入冬,市场淡季叠加部分区域疫情反弹因素,11月北京租赁市场呈现加速降温趋势。11月29日,贝壳研究院发布数据显示,11月北京市租赁成交量环比减少超过10%,各城区租赁市场均
...[详细]
天气转冷,北京租赁市场也正式入冬,市场淡季叠加部分区域疫情反弹因素,11月北京租赁市场呈现加速降温趋势。11月29日,贝壳研究院发布数据显示,11月北京市租赁成交量环比减少超过10%,各城区租赁市场均
...[详细] 9月12日消息,新材料研发智造企业厦门龙传君安新能源有限公司以下简称“龙传君安”)宣布已于近日完成天使轮融资,本轮融资由泉州市金控集团旗下的科创天使投资基金独家投资。据公开资料显示,龙传君安所研发的聚
...[详细]
9月12日消息,新材料研发智造企业厦门龙传君安新能源有限公司以下简称“龙传君安”)宣布已于近日完成天使轮融资,本轮融资由泉州市金控集团旗下的科创天使投资基金独家投资。据公开资料显示,龙传君安所研发的聚
...[详细] TCL科技(000100.SZ)公布消息:近日增持中环股份股票共5855.2778万股
 李楠:iPhone 15不良心的地方在于屏幕 别再吹亮度了! -
 传NS后继机型搭载12GB内存 技术演示使用DLSS 3.1
 知名车评人:iPhone 15必买 安卓手机拍视频水平不够 -
 和泓服务(06093.HK)年度净利5635.7万元 每股基本盈利为12.76分